

9 Tips for Better Sketches (and More Fun!)
Yesterday, 12 intrepid sketchers from the Watercolor Minimalist class at Wet Paint descended on Como Conservatory determined to learn some tips and tricks for sketching on location in a short amount of time and with minimal stuff. It was a gorgeous day, there were beautiful subjects all around us, restrooms and cafe nearby, and not much in the way of wind or bugs. It doesn’t get much better than that!

Kudos to everyone who came out and bravely practiced their sketching yesterday! I hope you all had fun and picked up one or two helpful hints.
As I watched everyone working, and talked with people about their frustrations and triumphs, I reflected on how many of us run into trouble because we have some misconceptions about sketching, or maybe we lack good sketching habits. This is sad because people think they’re struggling because they have no talent, when in fact a lot of what they are feeling and experiencing is just normal to everyone who goes out to sketch.
I still get in my own way a lot when I go out to sketch. But, over the years, shifting my strategy and thinking to minimizing the obstacles that I create for myself has helped me have a LOT more fun (and that has helped me actually get out and practice more often), and along the way make at least some sketches that I’m happy with.
If you want to have more fun sketching—and better sketches—here are some ideas to try.
Tip #1: Leave your camera at home (or in your bag).
When I take my camera, I’m too tempted to think, “Before I start I’ll just snap a quick photo for reference.” If I stopped at ONE, maybe it would be helpful. But for me, having my camera in hand usually means I’ll come back with a boatload of hastily-snapped and poorly-composed photos, and one crappy sketch dashed off in 15 minutes when I realized it was almost time to leave.
If you don’t have a camera, then you have to use your sketchbook instead!
Tip #2: Quit trying to find the perfect subject.
I used to spend all my sketching time traipsing around, sure that the very best subject was just around the corner. Wandering around looking for the perfect subject is a recipe for wandering, not sketching.
Tip #3: Warm up with quick exploratory drawings.
Looking for the perfect subject means you spend too much time wandering around instead of sketching. But plopping down and drawing the first thing that suggests itself often means you sketch clichés.
Instead, try this: Take along some cheap copy paper—or designate some pages at the back of your sketchbook—for exploratory drawings. The point of an exploratory drawing is not to “make a picture”; it’s to get your eye and hand warmed up and moving together, and to activate your “artist’s brain”. You’re going to discard these, so don’t worry about making them look like anything!
Pick a subject—anything—and start drawing quickly. Start anywhere, keep your eyes mostly on the subject, keep your pen or pencil moving rapidly with your eyes, and don’t bother with measuring or being accurate or even being recognizable. If you get bored, abandon the drawing and move on to another exploratory drawing.
As the name implies, exploratory drawings are a way to help you explore possible subjects and compositions. Even though they are often basically scribbles, I find that I see things differently—and do a MUCH better job of choosing a subject and composition—when I have a pen or pencil moving on the page.
Here’s part of a page of exploratory drawings. It’s hard to even tell what they are, and that’s OKAY! These are not “thumbnail drawings”. They’re not complete compositions, and I don’t have to “finish” them in any way. I’m not worrying yet about color or value or anything in particular. I’m just letting my hand lead my eye.
So you can get an idea of how crude and unformed they are, the one in the upper left is the weather vane and top of the roof of the carousel building. Below it is a scribble-drawing of some shapes from a canna lily, where you can also see me playing around with the idea of cropping in very close and sketching just a portion of the flower. On the right is a quick drawing of a lamppost. I knew I wasn’t interested in drawing the lamppost in more detail, but I thought the shape might be a nice addition to a larger scene.

Try taking a few minutes to do 5-10 exploratory drawings before choosing a subject to sketch. Don’t make a huge chore out of it! In class, I gave the group 30 minutes to do a bunch of these, but I usually do 5-10 in about 5-10 minutes.
Not only is it time well spent in terms of choosing a better subject and composition than my first impulse, it also helps me relax. Because I know these are going in the trash, my inner critic doesn’t start beating me up right off the bat.
Tip #4: Know (and remind yourself by writing it in your sketchbook) why you’re making this sketch.
How can you know if a sketch is any good, if you don’t know what it’s for?
Instead of making a typed handout for my class yesterday, I thought it would be more fun to make the handout a page in my sketchbook. I write notes in my sketchbooks all the time—including reminders to myself about why I’m out sketching that day, and what drew me to a scene. This kind of page is what results when I take a class myself. My notes are usually part words, part little cartoony images.

See all these little sketches of things you might want to take on a sketching trip? Isn’t that more fun than a bullet list? Does it help get you in the mood to sketch?
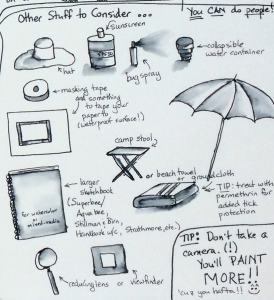
But are they accurate renderings? Heck no! Does that make them “bad sketches”? Judging from the reactions of my students, these little drawings were fun and motivating. Crude as they are, they are GOOD sketches, because they served their intended purpose.
Even if you don’t think paintings should look like photos, in the back of your mind you can hear people saying, “Wow! You’re so talented! That looks just like a photo!” But do you really think it would be more appealing to get a photorealistic drawing of all my sketching supplies? Or a photo?
Yes, it’s great to acquire skill in rendering, but practicing accurate rendering and drawing a charming sketch to capture the feel of your vacation are NOT the same activity. When you try to combine them, you only get frustration and overworked sketches.
If, on the other hand, you ARE practicing accurate rendering, then you don’t need to “complete” a sketch or even make it recognizable. You can draw the part that’s interesting or challenging and then move on to another sketch. If your goal is perspective drawing, you might just draw the main sections of a building. If your goal is to learn to suggest textures, you might seek out and sketch various surfaces.
Know what you’re working on in this sketch and write it down in your sketchbook! Believe me, as soon as you go into “drawing mode”, you’ll lose sight of “I’m practicing suggesting various textures,” and find yourself drawing the entire boulder instead of one-inch of its rough surface. If you’re practicing textures . . .
. . . don’t draw the entire boulder!
Which leads to
Tip #5: Focus on ONE THING per sketch!
I don’t mean one object. I mean, have one purpose for your sketch and don’t add in anything that doesn’t help achieve that purpose. For example, I was most interested in the glass dome of the conservatory building. It was interesting that some portions were translucent, letting the green of the palms show through, some parts were reflective, and some were shadowy. The rest of the building wasn’t all that interesting to me. To capture what interested me, do I need to draw the whole building? Do I need to draw every pane of glass to give you the idea that there are a lot of panes?
Especially when travel sketching where time on one location may be limited and you may be interrupted at any moment, it makes sense to start with the part of the subject that interests you most. Or maybe suggest the overall outline and then go right to the details you like best. (And maybe end there, too!)
I’d put this in a travel journal along with a few words saying where it was drawn. If this is part of my travel journal, the words can tell part of the story and the image can tell another part. Neither one has to do it all!

We all know how to do this. If you were sending a friend a postcard from Italy, you would not use up valuable real estate describing in minute detail every security line you stood in, the texture of the upholstery on the airline seats, the color of the departure lounge, etc. You’d leave out the boring parts!
Give yourself permission to make sketches that are lively postcard snippets or little poems; not the interminable, repetitive, boring narratives that one relative always tells!
Tip #6: Do multiple drafts.
You’ve heard me say it before: writers don’t expect to sit down and write a novel in one draft and not have to edit. Why would we think visual communication is any different?
Before my class arrived yesterday, I did a quick pencil sketch of the conservatory building so I’d be able to use it to demonstrate ways of applying color later. And yep, because I was rushing, I didn’t do any exploratory drawings, or even think much about composition. (My bad!) My purpose was reduced to “get some lines down on the page so I can use the drawing as a base”.
Then, I compounded the problem by using the same drawing to demonstrate four or five techniques, and later, to demonstrate some more ideas while answering questions. But the time I was done, it was muddy, overworked mess with no clear focus.

I used to think to myself, “Well, I wrecked that one . . . maybe sometime I’ll go back and try again.” But if you’re like most of us, you may not have the luxury of running back out to the same location to sketch the scene again.
Each time you sketch a subject (or type of subject), you’ll understand more of the characteristic shapes and figure out ways to suggest shapes, textures and so on. Familiarity with a type of subject matter is the reason experienced sketchers seem to be able to just sit down and make a great sketch on the first try. They’ve actually already solved a lot of the problems for that type of subject before. So making another sketch is a great idea!
If you can’t go back out to sketch the scene again right away, try this: Sketch again from memory.
If you’ve never tried it, you may be very surprised at how much you recall. If there are details you can’t recall, they’re probably details you didn’t care about, or wouldn’t have had time to get to anyway. Leave them out and do the parts you can remember. Even if you don’t remember very much the first few times you do this, you’ll be training your visual memory, and you’ll get better and better.
Besides training your visual memory, drafts allow you to try out different ideas and play with techniques. You might be partway into a sketch before you figure out what techniques you really want to use or what you really find appealing. (That’s part of the function of a sketch!) A second draft gives you a chance to start fresh with a bit more understanding of what you’re trying to achieve.
Here’s round 2, from memory:

That’s a livelier sketch! (I think it’s actually also a more accurate rendering.)
But why stop there? The above sketch is mostly line, with some washes for interest. What if I tried a sketch that was most washes with a little line work to sharpen it up?

Better? Worse? Who knows? It’s just a different approach. I liked the second draft as a page in my 9×12″ sketchbook, but this would probably be better for a postcard or an artist trading card where space is limited. I also had fun playing around with making the sky darker so I could have white highlights along the edge of the dome.
It’s hard to see in the photo, but I also experimented with washing a veil of white paint over a few portions of the dome to see if that would give the effect of the sky reflecting in the glass. Leaving out the pond and most of the detail on the bridge railing makes the building more clearly the center of interest.
As I experimented with technique, I also gradually zeroed in on what really captured my interest—the transparency and reflectivity of the glass—leading to the final sketch, which I showed you earlier. I happen to like this one best, but in many ways, it’s the “worst” drawing—incomplete and drawn with a wobbly line and poor proportions. But I actually like that in my travel sketches. So much so that I drew this with my nondominant hand so that drawing wouldn’t look too precise, and I used ink, so I could’t erase.
You might prefer one of the other sketches, or you might not like any of them, but I think you can get an idea of how I used my sketchbook to help fix the scene into my visual memory, and then play as a place to play around with methods and with what interested me about the scene.
Tip #7: Keep a sketchbook that’s just for experimenting and exploring.
As you experiment, you’ll develop your own “bag of tricks” and eventually, you’ll be able to sketch with much more confidence. And, telling yourself that you are exploring options means there’s not so much riding on any particular sketch.
It’s perfectly okay to have sketches you don’t like! They are not “failures”, they’re useful information about what you don’t care for or what doesn’t suit your personality. You won’t know if a technique suits you unless you play around with it. And you may not be able to explain—even to yourself!—what look you are trying to achieve in your work until you catch glimmers of it here and there.
Tip #8: Quit worrying about “talent”.
It seems almost universal to be dissatisfied with your own sketches, and still be charmed by the (possibly even less “accurate”) sketches of others. I don’t think this is just a matter of our tendency to be overly critical of our own efforts.
I think a couple of other things are involved that most of us forget to take into account.
One is that you learn a LOT in the process of making the sketch in the first place. The fact that you can see all the “mistakes” is because you made the sketch. You learn to see more clearly by making a first stab at a line or a shape and then comparing your “guesstimate” again with the scene. So of course you see all the flaws! In a sense, that’s what the process of drawing is all about.
If you draw the same scene again using what you just learned, you’ll fix some of the boo-boos. But you’ll also learn more, so you’ll likely still be dissatisfied with the second sketch. Your sketches can’t catch up! Learn to be at peace with that, and instead reflect on how the process of sketching is teaching you to see more clearly and fully.
The second issue is tougher: you’re the only one comparing your sketch to the ideal you were striving for.
Everyone else is taking it at face value, and they’re delighted! They’re not just being nice when they say they find it charming.
That doesn’t mean you should settle for less. That ideal we are striving towards is what drives us to make our art in the first place. But it’s not easy to chase that ideal! There is great joy in making art, but often frustration goes along with it. Remind yourself that it’s the nature of the beast, and not a reflection on your talent (or your worth as a person). Keep striving, and at the same time realize that you don’t have to completely achieve your ideal to succeed in delighting another person with your art, even if it’s “just” a quick little sketch!
Tip #9: Find sketching friends.
Nothing helps defuse the self-consciousness of sketching on location than not being the only one! If you want to establish a sketching habit, make a pact with someone else or join a sketching group.
One options in the Twin Cities is Metro Sketchers founded by Liz Carlson at Wet Paint.
Twin Cities artist Roz Stendahl lists some other Twin Cities sketch group options at this page on her website.
If you’re not in the Twin Cities, try checking out Urban Sketchers at urbansketchers.org to see if there is a chapter in your area or participate online. Or, try searching Google using the keywords Sketch Group or Sketch-Out in your area.
Happy sketching!


